Princess Seam Full Bust Adjustment Pt. 2
In the last post we’ve discussed how to check if you need a full bust adjustment and how much to add to the pattern. We’ve also demonstrated how a minimal FBA works in case you need to add 1″ or less. If you need more than that, you need to do a proper FBA and in this post we’ll guide you through that process. It seems like a lot of work when you look at the end result, but if you go step by step, it really isn’t that hard!
What you need
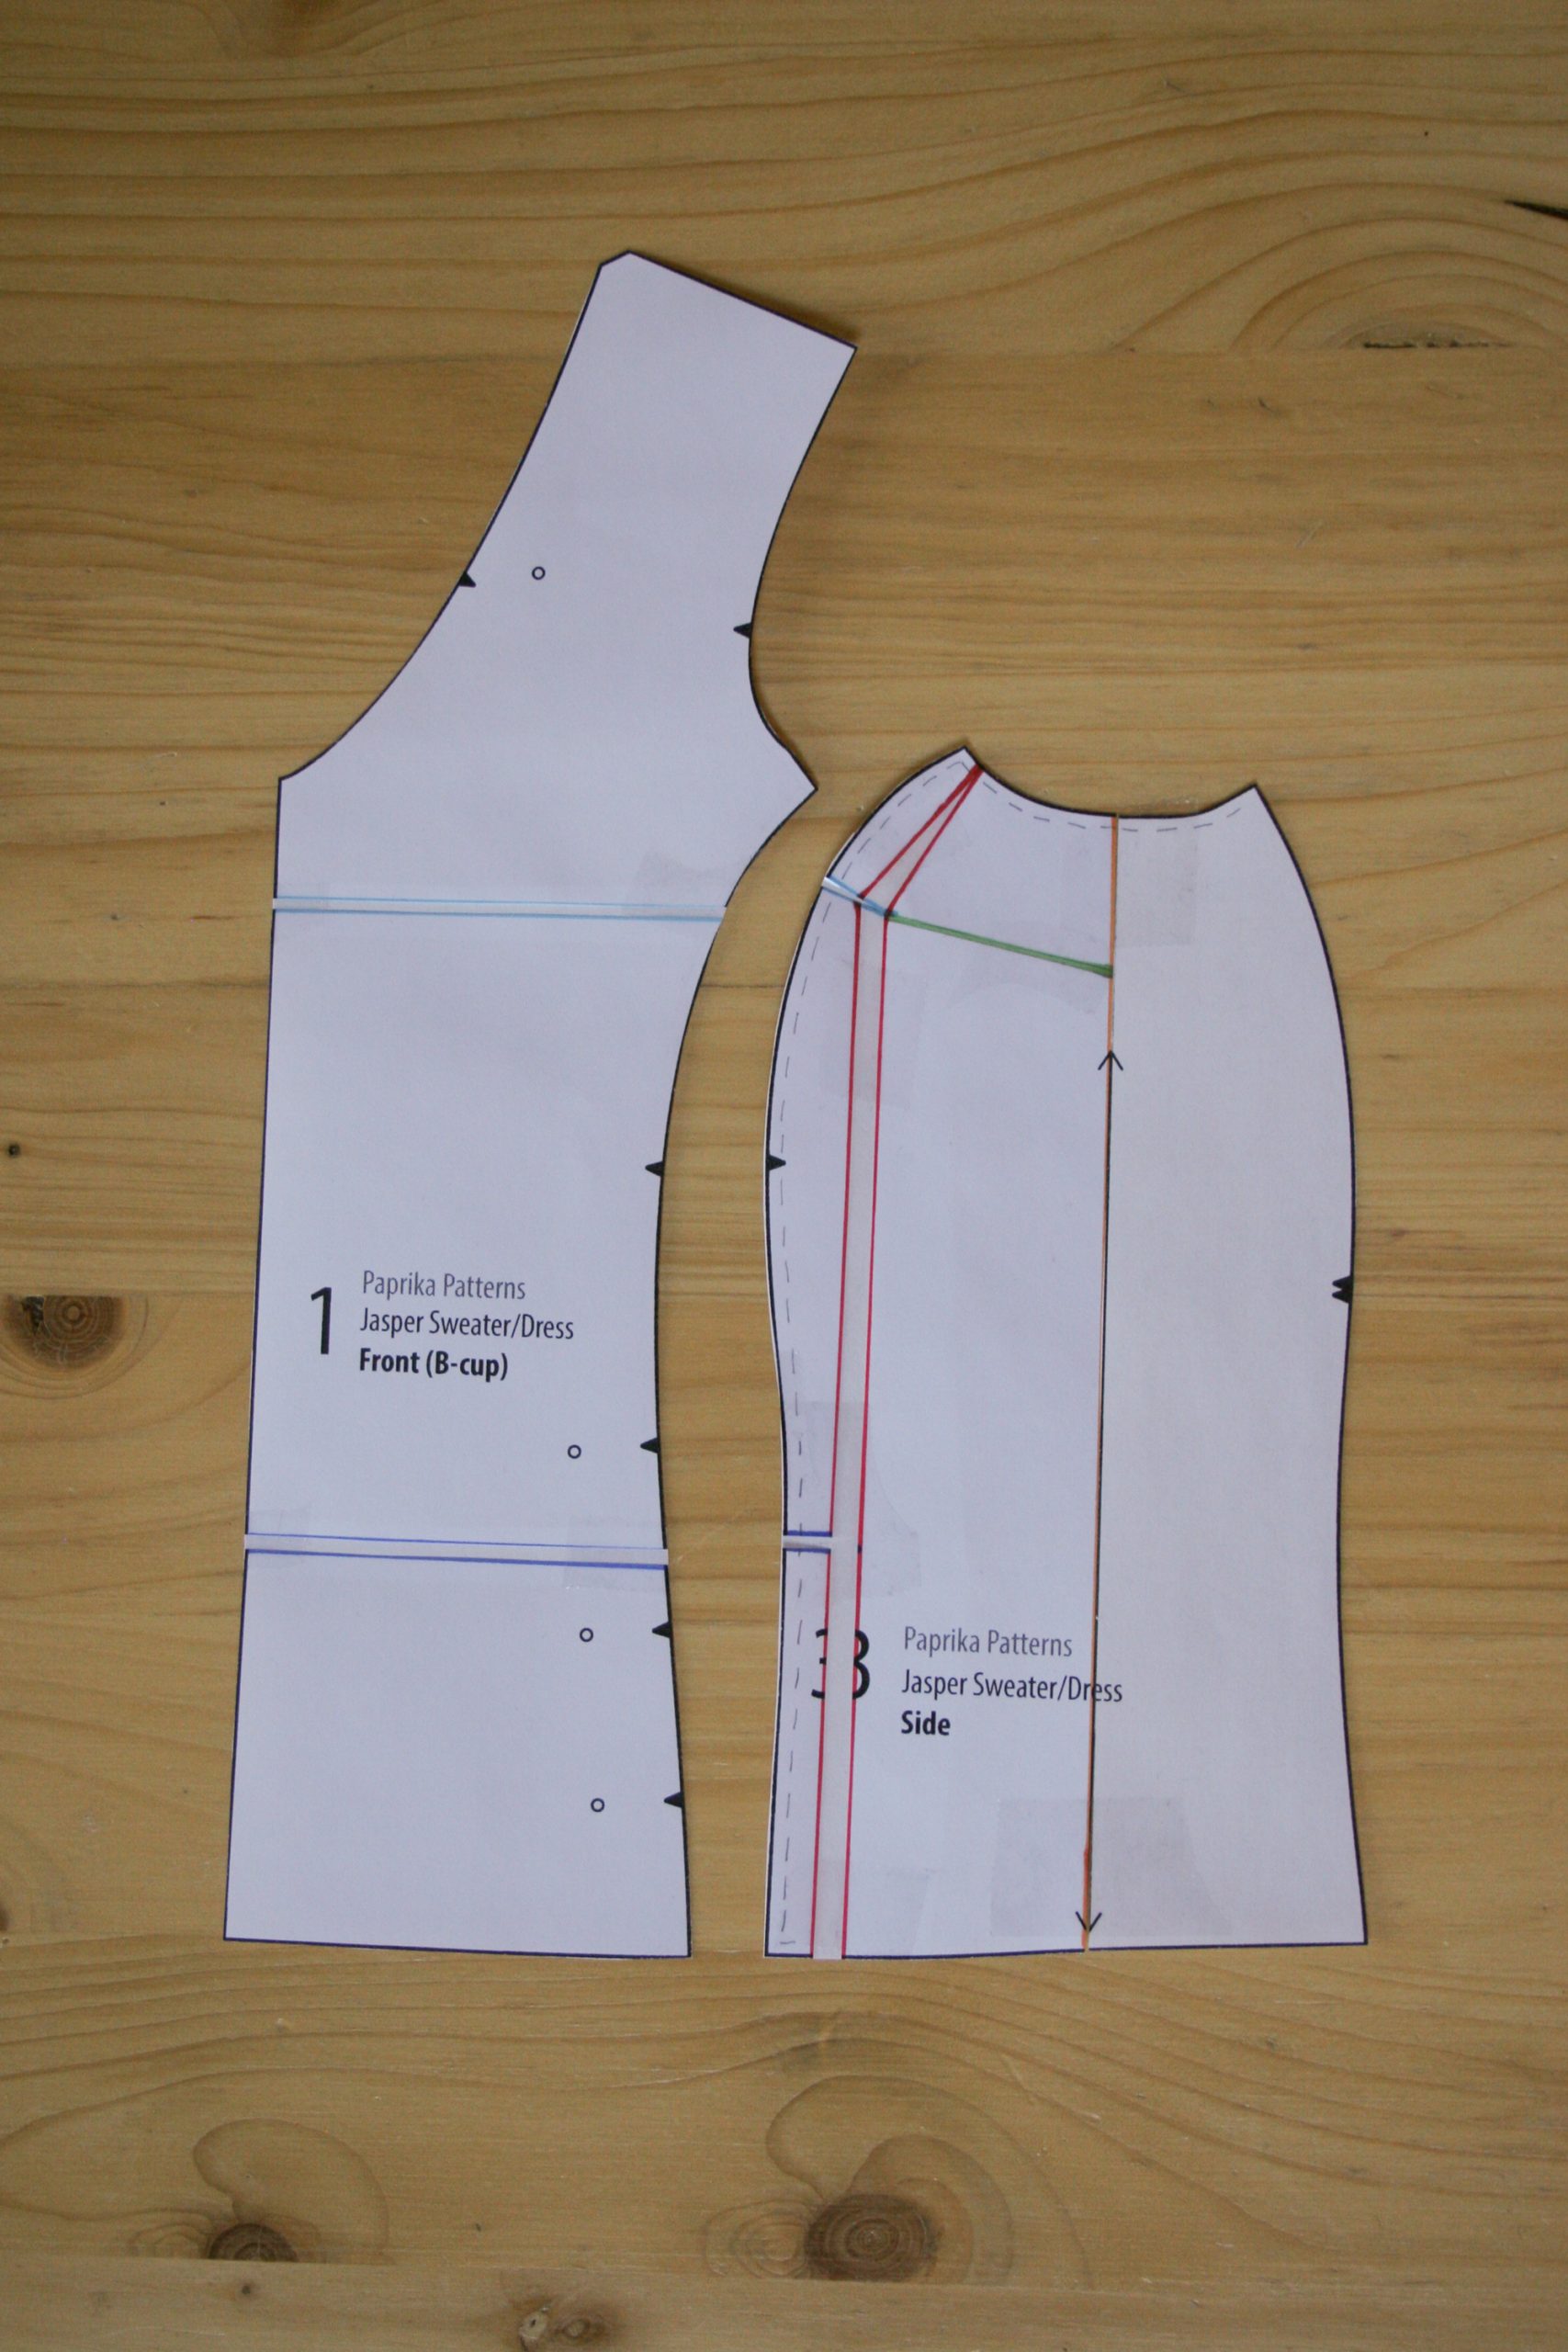
- Jasper pattern pieces, front and side panel
- a pencil
- a long straight ruler
- scissors
- extra paper
- tape
Step 1: Seam allowance

The Jasper has 5/8″ (1,5 cm) seam allowances included. To draft accurately, you need to be able to measure the stitching lines. Draw those in your front piece and side panel, but only at the armhole and the front seam line.
Step 2: Cut side panel


We’ll only work on the front side of the side panel piece. Extend the grainline arrow and cut the side panel in half.
Step 3: Draw lines


Choose a point close to the stitching line, at the fullest part of the bust. Draw three lines from there:
- straight down to the waist (red)
- up into the armhole (red)
- towards the side (green)
Also draw a line:
- at the waist, from the seam allowance to the red line (dark blue). Check with the front piece that you draw this one above the pocket notches. That’s higher than I did in this example.
Step 4: Cut


Make three cuts:
- into the red line from the waist up. Stop at the stitching line. Clip the red line at the seam allowance, but not through, so you have a hinge at the stitching line.
- into the green line from the side, leaving a hinge at the bust point.
- the dark blue line, all the way through.
Step 5: Spread

Pin or tape the curved section left of the red line to some extra paper so it can’t move. Spread out the right side of the piece by pulling it down and to the right, until you have the amount you need to add between the red lines. Make sure the pieces left and right of the red line are vertical and parallel. Tape the red lines down to some extra paper. Leave the green dart untaped for now.
Cut the blue line and move it down to make an even hem again. Tape it down to extra paper.
Step 6: Remove dart


Now we need to remove that dart that we have on the right side. Cut away the extra paper. Draw a line from the fullest part of the bust to the bust point. Cut the line but leave a hinge at the bust point. Close the dart on the right, opening up a small dart on the left. Slide some paper underneath and tape it down. Cut away the excess.
Step 7: Reconnect side piece


Now tape the side pieces back together. You’ve created room in the front without affecting the back of the side piece.
Step 8: Adjust front


The last thing to do is to incorporate the extra length you created in the side piece. Measure the two gaps at the stitching line of the side piece. Draw two lines across the front piece, at roughly the same height as the lines on the side piece. Cut these lines and add the corresponding length.
That’s it! I haven’t added a lot of room in this example, you can add much more than this. For example, Mary adds 3″ to her pattern in this post.
If you have any questions, leave a comment.


Hi Lisa!
I am working on this as we speak, exciting! Do you have any thoughts on how loose the extra width from the waist down? All tutorials I found on fba princess seams use a pattern with a front and back side panel (a side seam). Maybe I could just eyeball it and extract the 3,5cm on the front seam of the side panel, from the hip till the waist, without removing the extra space created for the boobs :) All thoughts would be welcome!
Greetings Floor
Hi Floor, good question! In this case without a side seam, you can take it out at the back princess seam, evenly divided between the back and the side panel to keep the curve in proportion.
Help! I’m making my daughters wedding g dress she is full busted, do I make the seam on the front come from the armhole over the nipple and down or not. I hope you can help
Hi Sarah, which seam do you mean? There are different types of princess seams, it can come from the armhole or the shoulder, depending on the pattern.
It’s the seam that comes from the arm hole
Then yes, if it originally comes from the armhole it will also do so after the adjustment.
If I do a full bust adjustment on the Jasper dress, do I also add the same width to the hem band?
Lois
Hi Lois, good question: Yes add the same width to the hem band.
If a pattern also has Back princess seams, do you just lengthen those accordingly?
Yes, if you lengthen the front you should also lengthen the back.
Hello,
I’m doing this right now but on the side piece for the Jasper sweater (sizes 6 to 10), the extended grainline arrow doesn’t reach the underarm, it goes to the point between the front seam and the underarm. Do I need to cut further away, parallel to the grainline arrow? And if so, does the exact place matter?
Thanks a lot in advance!
Hi Aurore, yes it would be best to draw a line in the middle of the side piece, parallel to the grainline arrow.