
Pattern Magic: Cowl Back Tee
So! First pattern magic post in a long time. I wanted to start simple and potentially wearable so I chose Studio Faro’s Cowl Back Tee. Studio Faro’s approach is not much different than the Pattern Magic books: a short explanation of how to manipulate the pattern, minimal measurements and no construction methods explained. This makes it more of an adventure I think, you just have to eyeball most of the measurements, make up your own construction order and then hope for the best. Fun!


Drafting
I used my own sloper to draft the pieces. I think having your own sloper is the best way to start out with these experiments: at least I know it will already be adjusted to my square shoulders, wide hips and long torso. The front is fairly easy, you add kimono cap sleeves widen and lengthen it. The measurements for this are provided. The back starts out the same way: add width, length and sleeves, and then also a yoke. Then you draft a number of lines in a curve along the back. No measurements are given, I just looked at the drawing to get them in roughly the same place. I did make the back shorter than instructed: 15 cm instead of 20. It felt disproportionate to me and I’m glad I went with my gut.
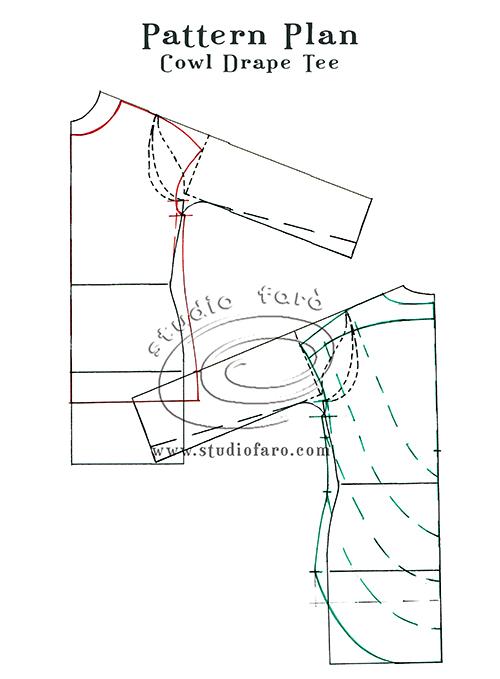
Then it’s slash and spread time: you cut along the curved lines but leave a hinge at the side seam. Then you spread each piece to create the extra space that will translate into extra fabric. There is no mention of how much to spread, I did 3″ (7.5 cm) between each piece. That resulted in a similar look as the example. The more you spread here, the bigger folds your cowl will eventually have. I can imagine spreading more at the bottom and less at the top for instance too, to create different kinds of folds. Not every spread will become it’s own fold though, this probably depends on the fabric too.

After spreading you tape your piece down and draw the outlines of the final pattern. This is where you can choose where you want the center back seam: at the top or at the bottom. I liked the view with the split at the top and wanted the cowl to fold undisturbed so I went with the centre back seam at the top. This was also the moment where I feared I didn’t spread enough and would end up with a sad droop instead of a cowl, but I forged ahead anyway. You can choose how big you want the split. At first I left it all the way open but it hangs open too much, and diminishes the cowl effect. It’s a tricky one to sew though, since it is jersey and on the bias along these edges. [EDIT: It turns out the slit is actually a pleat in the Studio Faro drawing. I should have looked closer, but I guess when following the instructions you can make either a pleat or a slit, depending how much you add to the CB.]


Fabric
This design calls for a jersey with some drape. I don’t think I read anything in the Studio Faro blogpost about it, but the clues are in the name (drape back tee) and the cowl. I used a 100% cotton interlock from Rijstextiles. It does work well with this design, it has enough drape to get nice pronounced folds at the cowl. But ugh, this fabric. It was a left over, a backup for the Jade skirt samples, and not even a cheap one. When I washed it I already noticed it didn’t have a great recovery. When sewing my machine kept skipping stitches, stretching the fabric, etc. I didn’t finish the armholes and hem because of this. Also, it can’t take any heat. The fabric discoloures immediately, even with the iron on the wool setting. So I had to turn off the steam and just press the seams with the tip of the iron. I still managed to get a nice heat stain right on the front. One good thing: it is really soft. So now that it’s finished, wearing it will be nice.


The Magic
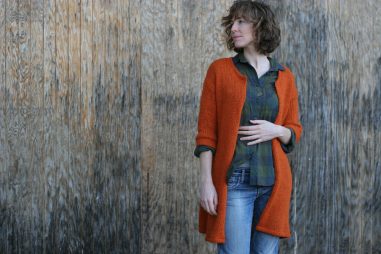
I think I can call this one a succes! It is not magic of the unexpected kind, but the cowl effect is there. I like the slit (except that it has stretched while sewing, but I hope a wash will sort that out) and the yoke. The end of the center back seam has a tendency to poke out instead of pointing inward, like in the first photo above. A kind of waist stay might help with that, maybe just a piece of elastic from one side seam to another with the tip of the CB seam attached in the middle. But overall, a fun shirt to draft and to wear, and despite the sewing woes I’m happy to add this to my wardrobe.
What do you think? Does this look like some magic you’d want to try?


I like it. Nice casual wear but could also look good… and I’m thinking of doing it, in a rayon velvet (very fluid) tunic. Longer style (say mid thigh) and with a longer slit at the back. I think the waist stay is a good idea or even half a one. Nice pattern skillz.
Rayon velvet sounds delicious! And it’s easy to make it as long as you want.
That top is so cute! I wish I had a sloper set..I think the looseness of the pattern magic things would be really fun. I treat a lot of patterns like that anyways- constructing them in my own order. I’m glad you’re doing these posts, it’s creatively inspiring :)
A sloper is really useful in so many ways! Go for it :)
it’s cool and unusual, i would totally make something similar! maybe even as a dress
Yes it could be a dress too! It would make the back pattern curve in a really weird way, even more magical.
Thanks so much for the link back to my blog. Love your #PatternPuzzle Cowl Back Tee and especially your different interpretation of the CB pleat under the yoke. You have made a wonderful job of it. :) My blog posts are always just about the pattern making, as you say. That’s my thing – I’m a pattern making teacher and commercial pattern maker for local industry. Btw your focus on the importance of having your own well-fitted sloper/block is a great insight. It also demonstrates the value of all the different points of view that are shared in this amazing blogging community.
In your Facebook message you mentioned the idea of having a place for Maker’s to post their work. I have my web person working on a solution to a dedicated Maker’s Place at the end of each blog post. I hope to have that working in the next month or so. Thanks for the timely reminder. :)
Hi Anita, it’s funny that you mention the pleat, now that I know I see it in your drawing! I didn’t look closely enough and saw it as a slit. I wouldn’t want more directions in your posts, I like figuring things out by myself.
I don’t think it’s one I’d try myself– I’ve noticed that a lot of the Japanese-style patterns would be extremely unflattering for my figure. Right around my backside is definitely not where I need a bunch of draped fabric hitting! But it looks great on you.
Thanks! Yes I’ve seen the same. For me it’s the lack of waist definition that prevents me from trying them out.
Gorgeous top. I’ve been looking at this one on the Studio Faro blog, and I think you’ve tipped me over the edge.
Cool, I hope you can share it if you make it.
Love your effort. Well done. Looks great on you! I would recommend a small weight added to the inside of the cowl. That should keep the cowl folding inward instead of outward. Also, it would still allow for the fluid movement of the cowl, something the waist stay would not. Just a suggestion. :-)
A weight, how clever! Thanks for the suggestion!